Battery switch on travel trailer function is crucial for managing your RV’s power. Understanding how this simple yet vital component works is key to avoiding electrical issues and ensuring a smooth camping experience. This guide breaks down everything you need to know, from the different types of switches available to troubleshooting common problems and performing essential maintenance.
We’ll cover the basics of battery switch operation, explain how they interact with other electrical systems like your converter and solar panels, and walk you through safe operation and maintenance procedures. Think of this as your complete handbook for mastering your travel trailer’s battery switch system.
Understanding Battery Switch Functionality in Travel Trailers
A battery switch is a crucial component in any travel trailer’s electrical system, allowing you to manage and control the power flow from your trailer’s batteries. Understanding how it works is key to preventing electrical issues and ensuring your trailer’s appliances function correctly. This section details the purpose, types, and wiring of these switches.
Battery Switch Purposes
The primary purpose of a battery switch in a travel trailer is to isolate or connect your house batteries to the trailer’s electrical system and potentially to an external charging source. This isolation is important for several reasons: preventing battery drain when the trailer isn’t in use, allowing for safe maintenance on the battery system, and choosing between different power sources (shore power, generator, or solar).
Types of Battery Switches
Several types of battery switches cater to different needs. A single battery switch is the simplest, connecting or disconnecting a single battery bank to the trailer’s electrical system. Dual battery switches control two separate battery banks, allowing for independent management of each bank. Selector switches offer more control, allowing you to select between different power sources (like shore power or batteries) or to isolate specific batteries.
Some advanced switches even include features like remote control or monitoring capabilities.
Typical Wiring Configuration
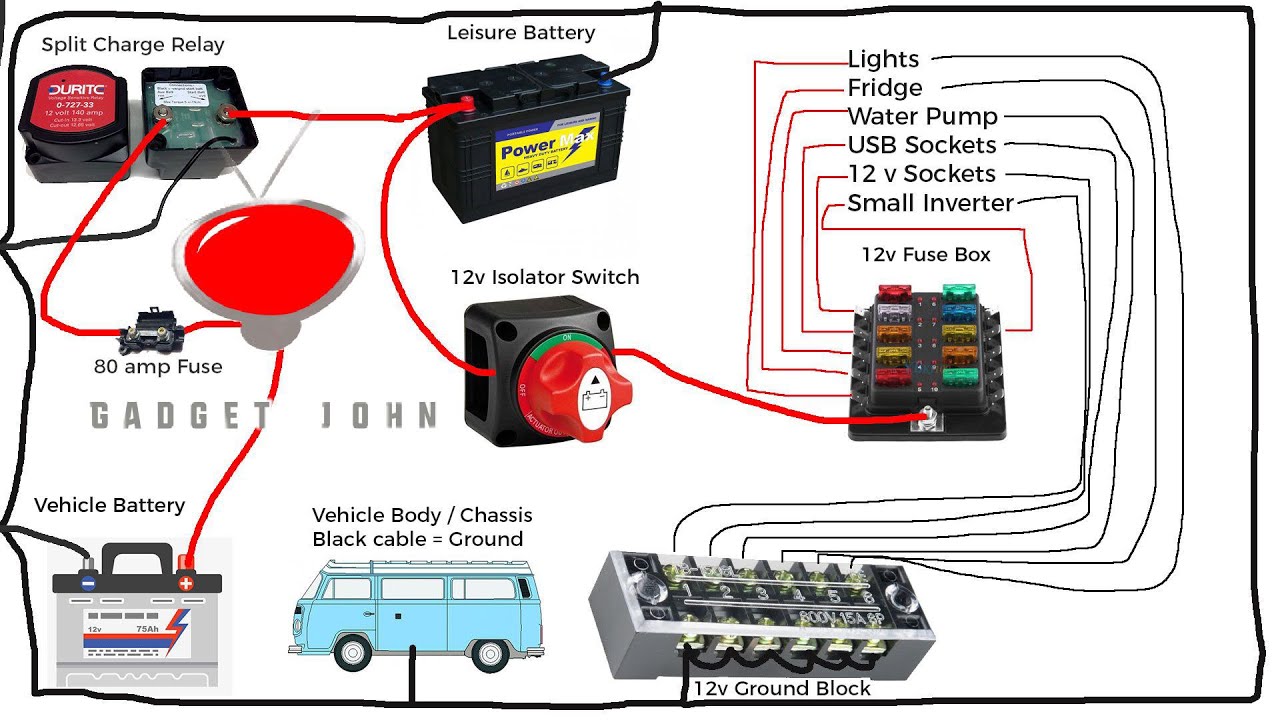
A basic battery switch system involves several key components: the battery switch itself, the house batteries, the trailer’s electrical system (including the converter, lights, appliances, etc.), and often, a charging source. The wiring connects the battery’s positive (+) terminal to the input of the battery switch. The output of the switch then connects to the positive bus bar of the trailer’s electrical system.
The negative (-) terminal of the battery is usually connected directly to the negative bus bar, bypassing the switch for safety reasons.
Basic Battery Switch Setup Diagram
| Component | Connection |
|---|---|
| House Battery (Positive Terminal) | Battery Switch Input (+) |
| Battery Switch Output (+) | Trailer’s Positive Bus Bar |
| House Battery (Negative Terminal) | Trailer’s Negative Bus Bar |
| Shore Power/Generator | Battery Charger (Connects to both battery banks if applicable) |
| Battery Charger | House Batteries |
| Trailer Appliances/Lights | Trailer’s Positive and Negative Bus Bars |
Battery Switch Operation and Procedures
Understanding how to properly operate your travel trailer’s battery switch is crucial for maintaining power and preventing damage to your electrical system. This section details safe operating procedures and essential maintenance practices to keep your battery system running smoothly.Proper operation of the battery switch ensures that you’re directing power correctly, protecting your batteries, and preventing accidental drain. Neglecting this simple system can lead to dead batteries, malfunctioning appliances, and even potential fire hazards.
So, you’re an audiophile who loves to travel? Awesome! Check out this guide on creating the perfect audiophile travel setup to ensure your tunes sound amazing on the go. Don’t forget to sort out your travel insurance before you leave; getting Aon travel insurance is a smart move for peace of mind, covering everything from lost luggage to medical emergencies.
With your music and insurance sorted, you’re ready for an unforgettable adventure!
Safe Battery Switch Operation
Operating the battery switch is straightforward, but safety precautions are essential. Always turn off any appliances before switching. This prevents electrical surges and protects sensitive electronics. Identify the switch positions clearly; usually, there are positions for “off,” “batteries only,” and “batteries and shore power.” Never attempt to operate the switch while wearing jewelry or loose clothing that could get caught in moving parts.
So, you’re an audiophile who loves to travel? Awesome! Check out this guide on building the perfect audiophile travel setup to keep your ears happy on the go. It’s crucial to protect your investment, though, so don’t forget to sort out travel insurance before you jet off. A solid plan like Aon travel insurance can give you peace of mind knowing your gear is covered.
Get those tunes sorted and then get insured – happy travels!
Finally, make sure your hands are dry before touching the switch to avoid electrical shock.
- Identify the Switch Positions: Familiarize yourself with the markings on your battery switch. Common positions include “Off,” “Battery,” and “Battery + Shore Power.”
- Turn Off Appliances: Before switching, turn off all appliances and electronics connected to the trailer’s electrical system. This prevents potential surges or damage.
- Switch to the Desired Position: Carefully move the switch to the appropriate position for your needs. If you are disconnecting from shore power, switch to the “Battery” position. If you are connecting to shore power, switch to the “Battery + Shore Power” position. If not using the trailer for an extended period, switch to the “Off” position.
- Verify Functionality: After switching, test your appliances to ensure power is functioning correctly. If not, double-check the switch position and all connections.
Battery Switch System Maintenance
Regular maintenance of your battery switch system is vital for preventing problems and extending the life of your batteries and electrical components. This includes inspecting connections, cleaning terminals, and checking the switch itself for any signs of damage or corrosion. Neglecting this can lead to poor electrical connections, battery drain, and even potential fire hazards.
- Regular Inspection: Visually inspect the battery switch, cables, and connections at least once a month. Look for corrosion, loose connections, or any signs of damage.
- Cleaning Battery Terminals: Clean battery terminals regularly using a wire brush and baking soda solution to remove corrosion. This ensures good electrical contact and prevents voltage drop.
- Tighten Connections: Periodically tighten all battery cable connections to ensure a secure and reliable electrical path. Loose connections can cause voltage drop and overheating.
- Lubrication: Some switches may benefit from periodic lubrication of moving parts with a dielectric grease, following manufacturer’s recommendations. This helps ensure smooth operation and prevents corrosion.
Pre-Trip Battery System Inspection Checklist
A thorough pre-trip inspection is crucial for ensuring a safe and enjoyable camping experience. This checklist focuses specifically on the battery system and switch, helping to prevent unexpected problems on the road.
| Item | Check |
|---|---|
| Battery Switch Operation | Test all switch positions (Off, Battery, Battery + Shore Power) and verify functionality. |
| Battery Terminal Connections | Inspect for corrosion, tightness, and cleanliness. Clean and tighten as needed. |
| Battery Voltage | Measure battery voltage using a multimeter. Ensure voltage is within acceptable range for your battery type. |
| Battery Cables | Check for any damage, fraying, or loose connections. Replace damaged cables. |
| Switch Functionality | Ensure the switch moves smoothly and clicks into each position securely. |
Battery Switch and Related Systems
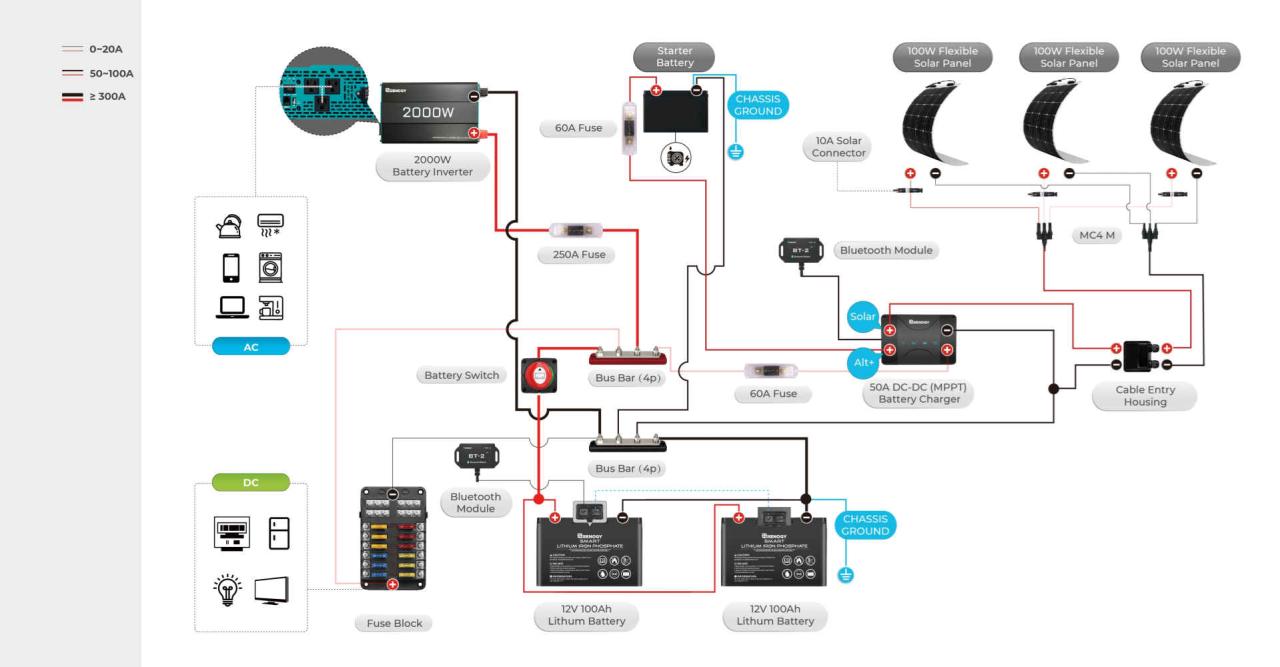
Your travel trailer’s battery switch is the central control point for managing power flow between your batteries, the shore power connection, the converter, and any solar panels. Understanding how it interacts with these systems is key to safely and efficiently using your trailer’s electricity. Proper operation prevents damage to your equipment and ensures a reliable power supply.The battery switch directly controls the flow of power from your batteries to the rest of your trailer’s electrical system.
When the switch is in the “on” position, power from the batteries is available to run lights, appliances, and other 12V devices. Conversely, in the “off” position, this power flow is completely cut off, preventing battery drain. The switch’s interaction with other systems dictates how your batteries are charged and discharged.
Battery Switch and Converter Interaction
The converter is a crucial component, transforming 120V AC shore power (or generator power) into 12V DC to charge your trailer batteries. With the battery switch in the “on” position, the converter charges the batteries while simultaneously supplying power to the 12V system. If the switch is “off,” the converter still receives 120V AC power but will not charge the batteries; it will only power any 12V circuits directly connected to the AC side of the converter.
This can vary depending on your specific converter’s design. Some converters have a built-in bypass system that allows charging regardless of the battery switch position.
Battery Switch and Solar Panel Interaction
Solar panels provide an alternative charging source. Most solar panel systems include a charge controller that regulates the flow of power from the panels to the batteries. The battery switch’s position influences how the solar panels charge the batteries. With the switch “on,” the solar charge controller will direct power to the batteries; if “off,” the charge controller typically stops charging to prevent overcharging or conflicts within the system.
However, some more advanced systems might bypass this limitation.
Battery Switch and Shore Power Interaction
Shore power provides electricity from an external source (like a campground hookup). The battery switch doesn’t directly control the flow of shore power to the trailer’s 120V AC outlets and appliances. Instead, it primarily manages the 12V DC system. However, the converter’s interaction with the battery switch indirectly affects shore power utilization, as explained above.
Connecting and Disconnecting Power Sources, Battery switch on travel trailer function
Connecting and disconnecting power sources requires careful use of the battery switch. When connecting to shore power, turn the battery switch to the “on” position to allow the converter to charge the batteries. If you are using only shore power and don’t need battery power, you can leave the switch on or off depending on your setup and preferences.
To disconnect shore power, simply unplug the cable. The battery switch’s position will then determine whether the 12V system runs off the batteries (if the switch is “on”) or remains completely off (if the switch is “off”).
Power Flow Flowchart
Imagine a simple flowchart. At the top is the source: Shore Power, Solar Panels, or Batteries. Each source has a line leading to a box representing the Battery Switch. The switch has three outgoing lines: “Off” (leading to a “No Power” box), “On” (leading to a box representing the 12V System), and (if applicable) a line for a “Bypass” to directly charge the batteries.
The 12V system box then branches out to various 12V devices within the trailer. The complexity of the flowchart will depend on the sophistication of your RV’s electrical system. For instance, a system with a separate solar charge controller might show a separate line from the solar panels to the batteries, bypassing the main battery switch.
Mastering your travel trailer’s battery switch is more than just flipping a switch; it’s about understanding your RV’s power system and ensuring safe and reliable operation. By following the guidelines and troubleshooting tips Artikeld here, you’ll be equipped to confidently manage your power, prevent costly repairs, and enjoy worry-free adventures on the road. So, get to know your battery switch – it’s your key to happy camping!
Popular Questions: Battery Switch On Travel Trailer Function
What happens if I leave my battery switch on while the trailer is stored?
Leaving the switch on while stored can drain your batteries, especially if there’s a parasitic drain somewhere in your RV’s electrical system. It’s best to switch it off for extended storage.
How often should I check my battery switch and connections?
Before each trip and at least every three months, inspect the switch for corrosion and the connections for tightness. Clean any corrosion you find.
Can I use a battery switch with different types of batteries (e.g., lead-acid and lithium)?
Generally, a standard battery switch is designed for lead-acid batteries. Using it with lithium batteries might not be compatible and could damage the system. Check your switch and battery manufacturer’s recommendations.
My battery switch is making a clicking sound. What’s wrong?
A clicking sound often indicates a weak battery or a problem with the switch itself. Check your battery voltage and inspect the switch for any damage or loose connections.
